Val’s Small Thong Bulge
VAL’s SmallThongBulge
Thanks for the interest you put into this thong.
This thong constitutes my first attempt at making rigged cloth.
If you find something unusual, please let me know.
Will fit the Athena Rigged mesh body
features:
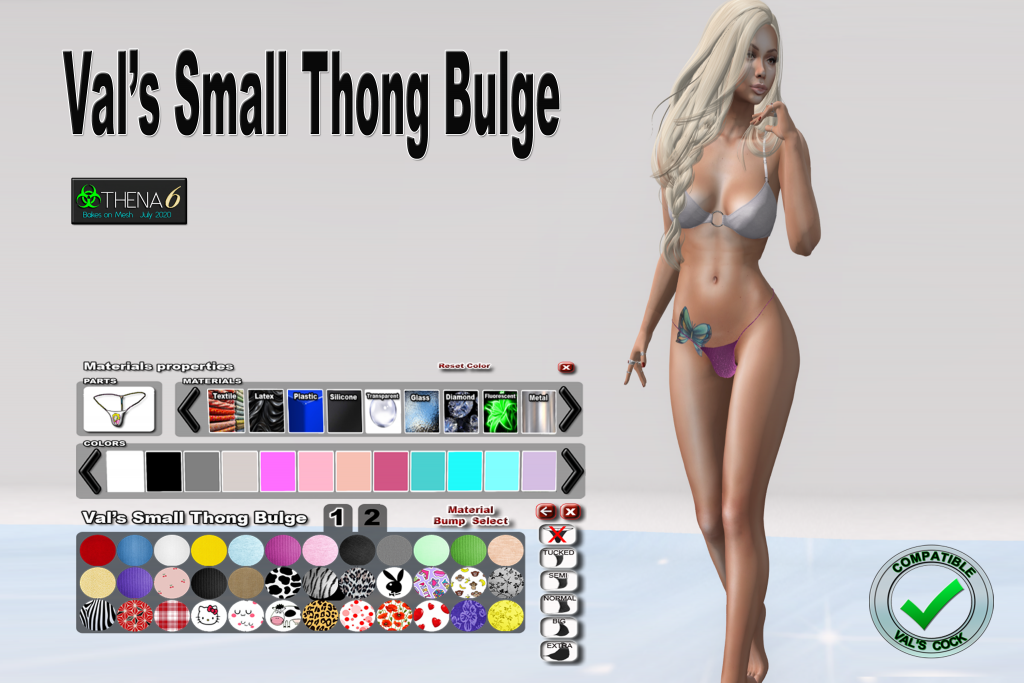
Rigged mesh thong
Hud can stay and get out of the way.
Easily remove your thong with a button.
5 Bulge size: from Tucked to Extra Big.
Set your thong with any of these combinations :
67 Textures to choose from (including one BLANK)
9 Materials to choose from : Textiles, Latex, Plastic, Silicone, Transparent, Glass, Diamond, Fluorescent, Metal
180 colors to pick from
Bump aspect on/off
Compatibility with Val’sCock 4.02 +
Editing textures/colors/materials

The hud:
Wear the SmallThongBulge and the Hud. And voila!
The buttons :
X Button: close the Hud.
Left Button: open / close the texture selection.
Select any of the 67 textures available in the 2 Tab, Press 1 or 2 to select tab
Material:
bump : toggle between using the “Bumpiness/Shininess” or not.
Select : Show the Material property window
Thong Button:
OFF : no thong shown, for when you can hide your underwear.
TUCKED : tucked, this position should hide easily under other cloth.
SEMI : Semi Tucked, this position should hide easily under other cloth.
NORMAL : Normal position, this position should hide easily under other cloth.
BIG : More for show off, as we are in os after all.
Material Property window:
Materials can be combined, colors, texture and bump
Parts : show the thong (there is no part to select from with the thong)
Materials : Use the arrows to scroll though all the available materials (9 at the moment) then click on materials to select
Colors : Use the arrows to scroll though all the available colors then click on colors
Compatibility between “Val’s Small Thong Bulge 2.5+” and “Val’s Cock 4.02+”
You need to wear both the cock and the thong for this to work.
The cock will interact accordingly with the Thong and vice versa.
If you select any thong format: big bulge, bulge, etc. the cock will automatically be put inside the thong.
if you set the thong to off, then cock will reappear as flaccid.
If you select any states of the cock then the thong will disappear… you get the idea, they interact together.
If you want to see the cock inside the thong, make sure you selected a thong material that is see-through.
if you want to set them both off : click twice the button “OFF” on the cock Hud.
Resizing the cock inside the thong if need be
If the size of the cock inside the thong does not fit for your avi size, proceed like this to adjust them:
- Select the thong size you want to edit (can be bigbulgeextra, bigbulge, bulge, tucked, semitucked ) from the thong Hud
- Select a transparent material, its gonna be easier to work with.
- Right Click Edit the Cock (not the thong)
- Edit Linked
- scroll the linked prim till you find the one you selected, the name will be as mentioned on pt1
- move or resize the prim so it fit inside the thong, you will see it bleeding then thong if it is too big.
- you might want to move the part and ring for the prim you selected also. their name are : thong you selected + “ring” or “part”
- voila!, one done, you can go back to step 2 to do the other size if you want,
- After you resized the cocks : to make sure you don’t loose your settings:
- detach the cock from you
- drop it on the floor
- wait a few seconds
- take it back,
- now you use this cock you just took.
Colors
You can add more color: simply open and edit the Notecard “!Materials” and add any specific color you’d like in the @Colors section.
They are shown in that order so you can add your own at any place you’d like.
Materials
You can add more materials: simply open and edit the Notecard “!Materials” and add any specific materials you’d like in the @Materials section.
They are shown in that order, so you can add your own at any place you’d like.
You will need to insert your image in the HUD with the name “Material_xxx”, Where xxx is your new material.
This image must be a png of 100×100 pixel.
If you think you found a cool material, please tell me, i might add it in the list.
Editing the current texture
With version 3.0+, you can now also edit the color more precisely to attain the color that will fit your clothing more easily or change to wear your own texture.
Note that these change you made wont be kept, they will stay like that until you change it for another thong/ color.
Please make sure you have a copy of your thong first, you will see its easy to mess things up.
From the Hud, Click the “left arrow” to expand the thong selection panel and click “select” to open the material / color selector.
Click any material/texture/color close to what you want. When ready click the “+” buttons beside “Colors”
The current texture/ color selected is shown on the right beside the material selector. Its from there that you will be able
to change the texture / color.
To edit, you edit like you would edit any texture on a prim, that is, you “right click edit” on that texture on the right,
make sure you select “faces” in the edit box, then click on the thong texture.
From there, in the “texture tab”, you can edit make sure you select “Binn-Thong” if you are using the new PBR version,
- you can apply a new texture
- fine tune the color in “Tint”
- change bumpiness, Transparency, etc, or any features for the texture.
When you are ready to apply the new texture, close the “right-click Edit box”, then click on the thong you just modified to apply the changes.
It will be transfered to the thong you are wearing, and that for any size.
and voila, your changed are are done.
You can then close the “Colors +” by pressing “+” again.
If you select another thong or color/ material, you will lose your change.